Tutorial: Element-Wise Matrix Operations in OpenCV
Table of Contents
Element-wise matrix operations are mathematical functions and algorithms in computer vision that work on individual elements of a matrix or, in other words, pixels of an image. It's important to note that element-wise operations can be parallelized, which fundamentally means that the order in which the elements of a matrix are processed is not important.
1. Basic operations
OpenCV provides all the necessary functions and overloaded operators that you need to perform all four basic operations of addition, subtraction, multiplication, and division between two matrices or a matrix and a scalar.
1.1. The addition operation
The add function and the + operator can be used to add the
elements of two matrices, or a matrix and a scalar, as shown in the
following examples:
Mat image = imread("Test.png");
Mat overlay = imread("Overlay.png");
Mat result;
add(image, overlay, result);
You can replace the last line in the preceding code with the following:
result = image + overlay;
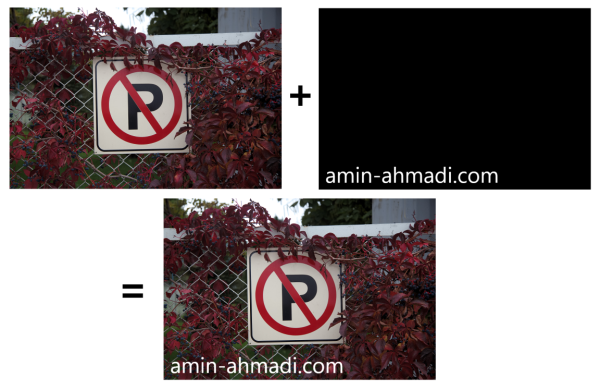
The following image demonstrates the resulting image of an add operation of two images:

In case, you want to add a single scalar value to all elements of a
Mat object, you can simply use something similar to the
following:
result = image + 80;
Once the above code is executed on a grayscale image, the result will be brighter than the source image. Note that if the image has three channels, you must use a three-item vector instead of a single value. For instance, to be able to make an RGB image brighter, you can use the following:
result = image + Vec3b(80, 80, 80);
Here's the image transformation when the above code is executed on it:

In the above example codes, simply increase the added value to get an even brighter image.
1.2. Weighted addition
Besides the simple addition of two images, you can also use the
weighted addition function to consider a weight for each of the two
images that are being added. Think of it as setting an opacity
level for each of the participants in an add operation. To
perform a weighted addition, you can use the addWeighted
function:
double alpha = 1.0; // First image weight
double beta = 0.30; // Second image weight
double gamma = 0.0; // Added to the sum
addWeighted(image, alpha, overlay, beta, gamma, result);
If executed on the sample pictures from the previous section with the add example, the result would be similar to the following:

Notice the transparent text that is similar to the watermark
usually applied by photo-editing applications. Notice the comments
in the code regarding the alpha, beta, and gamma values?
Obviously, providing a beta value of 1.0 would have made this
example exactly the same as a regular add function with no
transparency for the overlay text.
1.3. The subtraction operation
Similar to adding two Mat objects to each other, you can also
subtract all elements of one image from another using the
subtract function or the - operator. Here's an example:
Mat image = imread("Test.png");
Mat overlay = imread("Overlay.png");
Mat result;
subtract(image, overlay, result);
The last line in the preceding code can also be replaced with this:
result = image - overlay;
Here's the result of the subtraction operation:

Notice how the subtraction of higher pixel values (brighter pixels) from the source image results in the dark color of the overlay text. Also note that the subtraction operation depends on the order of its operands, unlike addition. Try swapping the operands and see what happens for yourself.
Just like addition, it's also possible to multiply a constant number with all of the pixels of an image. You can guess that the subtraction of a constant value from all pixels will result in a darker image (depending on the subtracted value) which is the opposite of the addition operation. Here's an example of making an image darker with a simple subtraction operation:
result = image - 80;
In case the source image is a three-channel RGB image, you need to use a vector as the second operand:
result = image - Vec3b(80, 80, 80);
1.4. The multiplication and division operations
Similar to addition and subtraction, you can also multiply all
elements of a Mat object with all elements of another Mat
object. The same can be done with the division operation. Again,
both operations can be performed with a matrix and a
scalar. Multiplication can be done using OpenCV's multiply
function (similar to the Mat::mul function), while division can
be performed using the divide function.
Here are some examples:
double scale = 1.25;
multiply(imageA, imageB, result1, scale);
divide(imageA, imageB, result2, scale);
scale in the above code is an additional parameter that can be
supplied to the multiply and divide functions to scale all of
the elements in the resulting Mat object. You can also perform
multiplication or division with a scalar, as seen in the following
examples:
resultBrighter = image * 5;
resultDarker = image / 5;
Obviously, the above code will produce two images, one that is five times brighter and one that is five times darker than the original image.
The important thing to note here is that, unlike addition and subtraction, the resulting image will not be homogeneously brighter or darker, and you'll notice that brighter areas become much brighter and vice versa.
The reason for this is obviously the effect of multiplication and division operations, in which the value of brighter pixels grows or drops much faster than smaller values after the operation. It's interesting to note that this same technique is used in most photo-editing applications to brighten or darken the bright areas of an image.
2. Bitwise logical operations
Just like basic operations, you can also perform bitwise logical operations on all of the elements of two matrices or a matrix and a scalar. For this reason, you can use the following functions:
bitwise_notbitwise_andbitwise_orbitwise_xor
It's immediately recognizable from their names that these functions
can perform Not, And, Or, and Exclusive OR operations.
First thing’s first, the bitwise_not function is used to invert
all the bits of all the pixels in an image. This function has the
same effect as the inversion operation that can be found in most
photo editing applications. Here's how it's used:
bitwise_not(image, result);
The above code can be replaced with the following too, which uses an
overloaded bitwise not operator (~) in C++:
result = ~image;
If the image is a monochrome black and white image, the result will contain an image with all white pixels replaced with black and vice versa. In case the image is an RGB color image, the result will be inverted (in the sense of its binary pixel values), which is depicted in the following image:

The bitwise_and function, or the & operator, is used to perform
a bitwise And operation on pixels from two images or on pixels
from an image and a scalar. Here is an example:
bitwise_and(image, mask, result);
You can simply use the & operator and write the following instead:
result = image & mask;
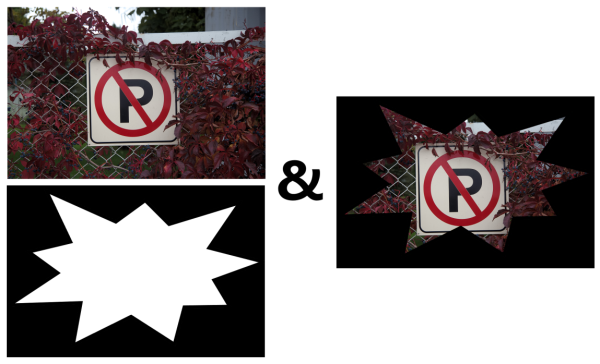
The bitwise_and function can be easily used to mask and extract
certain areas in images. For instance, the following image is a
demonstration of how bitwise_and results in an image that passes
the white pixels and removes the black pixels:

Besides masking certain areas of an image, the bitwise And
operation can be used to filter out a channel altogether. To be able
to do this, you need to use the second form of the & operator,
which takes a matrix and a scalar, and performs the And operation
between all pixels and that value. Here is an example code that can
be used to mask (zero out) the green color channel in an RGB color
image:
result = image & Vec3b(0xFF, 0x00, 0xFF);
It’s time to move on to the next bitwise operation, the Or
operation. The bitwise_or and | operators can both be used to
perform a bitwise Or operation on two images, or an image and a
scalar. Here is an example:
bitwise_or(image, mask, result);
You can use the | operator in the Or operation and simply write
the following instead of the above code:
result = image | mask;
If the And operation was used to pass through the non-zero pixels
(or non-black pixels), then it can be said that the Or operation
is used to pass through the pixel with the higher value (or
brighter) in any of its input images. Here's the result of
performing the bitwise Or operation:

Similar to the bitwise And operation, you can also use bitwise
Or operation to update an individual channel or all the pixels of
an image. Here is an example that shows how you can update only the
green channel in an RGB image to have the maximum possible value
(which is 255, or hexadecimal FF) in all of its pixels and leave
the other channels as they are:
result = image | Vec3b(0x00, 0xFF, 0x00);
Finally, you can use bitwise_xor, or the ^ operator to perform
an Exclusive Or between the pixels of two images, or an image and
a scalar. Here is an example:
bitwise_xor(image, mask, result);
Or simply use the ^ operator and write the following instead:
result = image ^ mask;
Here is the resulting image, if the Exclusive Or operation is
performed on the example image from the preceding section:

Notice how this operation leads to the inversion of the pixels in
the masked area? Think about the reason behind this by writing down
the pixel values on a paper and trying to calculate the result by
yourself. Exclusive Or, and all bitwise operations, can be used
for many other computer vision tasks if their behavior is clearly
understood.
3. Furthermore
If you found this article helpful and want to learn computer vision in more detail, you can explore Hands-On Algorithms for Computer Vision. I(KDr2) worked as the technical reviewer for this book. Packed with various hands-on computer vision examples, the book teaches you how to use the best and most popular computer vision algorithms using OpenCV. The author of the book, Amin Ahmadi Tazehkandi, is a computer vision expert, and this tutorial is also by him.
4. Discuss and Comment
Have few questions or feedback? Feel free to send me(killian.zhuo📧gmail.com) an email!