Tutorial: [CUDA] Vector operations in CUDA
Table of Contents
1. Two-vector addition program
To understand vector operation on the GPU, we will start by writing a vector addition program on the CPU and then modify it to utilize the parallel structure of GPU. We will take two arrays of some numbers and store the answer of element-wise addition in the third array. The vector addition function on CPU is shown here:
#include "stdio.h"
#include <iostream>

// Defining Number of elements in Array
#define N 5

// Defining vector addition function for CPU
void cpuAdd(int *h_a, int *h_b, int *h_c)
{
    int tid = 0;
    while (tid < N) {
        h_c[tid] = h_a[tid] + h_b[tid];
        tid += 1;
    }
}
The cpuAdd should be very simple to understand. One thing you
might find difficult to understand is the use of tid. If you have
a multicore CPU, then you can initialize tid equal to 0 and 1 for
each of them and then add 2 to it in the loop so that one CPU will
perform a sum on even elements and one CPU will perform addition on
odd elements. The main function of the code is shown here:
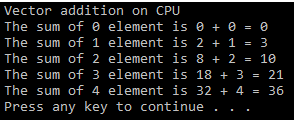
int main(void)
{
    int h_a[N], h_b[N], h_c[N];
    // Initializing two arrays for addition
    for (int i = 0; i < N; i++) {
        h_a[i] = 2 * i*i;
        h_b[i] = i;
    }
    // Calling CPU function for vector addition
    cpuAdd (h_a, h_b, h_c);
    // Printing Answer
    printf("Vector addition on CPU\n");
    for (int i = 0; i < N; i++) {
        printf("The sum of %d element is %d + %d = %d\n", i, h_a[i], h_b[i],             h_c[i]);
    }
    return 0;
}
There are two functions in the program: main and cpuAdd. In the
main function, we start by defining two arrays to hold inputs and
initialize it to some random numbers. Then, we pass these two arrays
as input to the cpuAdd function. The cpuAdd function stores the
answer in the third array. Then, we print this answer on the
console, which is shown here:
This explanation for using the tid in cpuadd function may give you
an idea of how to write the same function for the GPU execution,
which can have many cores in parallel. If we initialize this add
function with the ID of that core, then we can do the addition of
all the elements in parallel. So, the modified kernel function for
addition on the GPU is shown here:
#include "stdio.h"
#include <iostream>
#include <cuda.h>
#include <cuda_runtime.h>

// Defining number of elements in Array
#define N 5

// Defining Kernel function for vector addition
__global__ void gpuAdd(int *d_a, int *d_b, int *d_c)
{
    // Getting block index of current kernel
    int tid = blockIdx.x; // handle the data at this index
    if (tid < N)
        d_c[tid] = d_a[tid] + d_b[tid];
}
In the gpuAdd kernel function, tid is initialized with the block
ID of the current block in which the kernel is executing. All
kernels will add an array element indexed by this block ID. If the
number of blocks is equal to the number of elements in an array,
then all the addition operations will be done in parallel. How this
kernel is called from the main function is explained next. The code
for the main function is as follows:
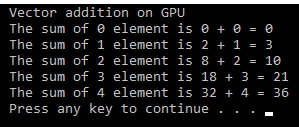
int main(void)
{
    // Defining host arrays
    int h_a[N], h_b[N], h_c[N];
    // Defining device pointers
    int *d_a, *d_b, *d_c;
    // allocate the memory
    cudaMalloc((void**)&d_a, N * sizeof(int));
    cudaMalloc((void**)&d_b, N * sizeof(int));
    cudaMalloc((void**)&d_c, N * sizeof(int));
    // Initializing Arrays
    for (int i = 0; i < N; i++) {
        h_a[i] = 2*i*i;
        h_b[i] = i ;
    }

    // Copy input arrays from host to device memory
    cudaMemcpy(d_a, h_a, N * sizeof(int), cudaMemcpyHostToDevice);
    cudaMemcpy(d_b, h_b, N * sizeof(int), cudaMemcpyHostToDevice);

    // Calling kernels with N blocks and one thread per block, passing
    // device pointers as parameters
    gpuAdd <<<N, 1 >>>(d_a, d_b, d_c);
    // Copy result back to host memory from device memory
    cudaMemcpy(h_c, d_c, N * sizeof(int), cudaMemcpyDeviceToHost);
    printf("Vector addition on GPU \n");
    // Printing result on console
    for (int i = 0; i < N; i++) {
        printf("The sum of %d element is %d + %d = %d\n",
            i, h_a[i], h_b[i],h_c[i]);
    }
    // Free up memory
    cudaFree(d_a);
    cudaFree(d_b);
    cudaFree(d_c);
    return 0;
}
Here’s the structure of the GPU main function:
- It starts with defining arrays and pointers for host and
device. The device pointers are allocated memory using the
cudaMallocfunction. - The arrays, which are to be passed to the kernel, are copied from
the host memory to the device memory by using the
cudaMemcpyfunction. - The kernel is launched by passing the device pointers as parameters to it. If you see the values inside the kernel launch operator, they are N and 1, which indicate we are launching N blocks with one thread per each block.
- The answer stored by the kernel on the device memory is copied
back to the host memory by again using the
cudaMemcpy, but this time with the direction of data transfer from the device to the host. And, finally, memory allocated to three device pointers is freed up by using the
cudaFreefunction. The output of the program is as follows:
All CUDA programs follow the same pattern as shown before. We are launching N blocks in parallel. The meaning of this is that we are launching N copies of the same kernel simultaneously.
You can understand this by taking a real-life example. Suppose you want to transfer five big boxes from one place to another. In the first method, you can perform this task by hiring one person who takes one block from one place to the other and repeat this five times. This option will take time, and it is similar to how vectors are added to the CPU.
Now, suppose you hire five people and each of them carries one box. Each of them also knows the ID of the box they are carrying. This option will be much faster than the previous one. Each one of them just needs to be told that they have to carry one box with a particular ID from one place to the other.
This is exactly how kernels are defined and executed on the
device. Each kernel copy knows the ID of it. This can be known by
the blockIdx.x command. Each copy works on an array element
indexed by its ID. All copies add all elements in parallel, which
significantly reduces the processing time for the entire array. So,
in a way, we are improving the throughput by doing operations in
parallel over CPU sequential execution. The comparison of throughput
between the CPU code and the GPU code is explained in the next
section.
2. Comparing latency between the CPU and the GPU code
The programs for CPU and the GPU addition are written in a modular way so you can play around with the value of N. If N is small, then you will not notice any significant time difference between the CPU and the GPU code. But if your N is sufficiently large, then you will notice a significant difference between the CPU execution time and the GPU execution time for the same-vector addition. The time taken for the execution of a particular block can be measured by adding the following lines to the existing code:
clock_t start_d = clock();
printf("Doing GPU Vector add\n");
gpuAdd <<<N, 1 >>>(d_a, d_b, d_c);
cudaThreadSynchronize();
clock_t end_d = clock();
double time_d = (double)(end_d - start_d) / CLOCKS_PER_SEC;
printf("No of Elements in Array:%d \n Device time %f seconds \n host time %f Seconds\n",
    N, time_d, time_h);
Time is measured by calculating the total number of clock cycles taken to perform a particular operation. This can be done by taking the difference of starting and ending the clock tick count, measured using the clock() function. This is divided by the number of clock cycles per second, to get the execution time. When N is taken as 10,000,000 in the previous vector addition programs of the CPU and the GPU, and executed simultaneously, the output is as follows:
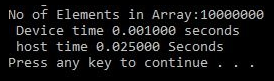
As can be seen from the output, the execution time or throughput is improved from 25 milliseconds to almost 1 millisecond when the same function is implemented on GPU. This proves that executing code in parallel on GPU helps improve the throughput.
3. Elementwise squaring of vectors in CUDA
Now, one question you can ask is, now that we are launching N blocks in parallel with one thread in each block, can we work in a reverse way? The answer is yes. We can launch only one block with N threads in parallel.
To show that and make you more familiar with working around vectors in CUDA, we take the second example of the element-wise squaring of numbers in an array. We take one array of numbers and return an array that contains the square of these numbers. The kernel function to find the element-wise square is shown here:
#include "stdio.h"
#include<iostream>
#include <cuda.h>
#include <cuda_runtime.h>

// Defining number of elements in Array
#define N 5

// Kernel function for squaring number
__global__ void gpuSquare(float *d_in, float *d_out)
{
    // Getting thread index for current kernel
    int tid = threadIdx.x; // handle the data at this index
    float temp = d_in[tid];
    d_out[tid] = temp*temp;
}
The gpuSquare kernel function has pointers to two arrays as
arguments. The first pointer d_in points to the memory location
where the input array is stored, while the second pointer d_out
points to the memory location where the output will be stored.
In this program, instead of launching multiple blocks in parallel,
we want to launch multiple threads in parallel, so tid is
initialized with a particular thread ID using threadIdx.x. The
main function for this program is as follows:
int main(void)
{
    // Defining Arrays for host
    float h_in[N], h_out[N];
    float *d_in, *d_out;
    // allocate the memory on the cpu
    cudaMalloc((void**)&d_in, N * sizeof(float));
    cudaMalloc((void**)&d_out, N * sizeof(float));
    // Initializing Array
    for (int i = 0; i < N; i++) {
        h_in[i] = i;
    }
    // Copy Array from host to device
    cudaMemcpy(d_in, h_in, N * sizeof(float), cudaMemcpyHostToDevice);
    // Calling square kernel with one block and N threads per block
    gpuSquare <<<1, N >>>(d_in, d_out);
    // Coping result back to host from device memory
    cudaMemcpy(h_out, d_out, N * sizeof(float), cudaMemcpyDeviceToHost);
    // Printing result on console
    printf("Square of Number on GPU \n");
    for (int i = 0; i < N; i++) {
        printf("The square of %f is %f\n", h_in[i], h_out[i]);
    }
    // Free up memory
    cudaFree(d_in);
    cudaFree(d_out);
    return 0;
}
This main function follows a similar structure to the vector addition program. One difference that you will see here is that we are launching a single block with N threads in parallel. The output of the program is as follows:

Whenever you are using this way of launching N threads in parallel, you should take care that the maximum threads per block are limited to 512 or 1,024. So, the value of N should be less than this value.
If N is 2,000 and the maximum number of threads per block for your
device is 512, then you can't write <<<1,2000 >>>. Instead, you
should use something like <<<4,500>>>. The choice of the number of
blocks and the number of threads per block should be made
judiciously.
4. Further Reading
This tutorial is by Bhaumik Vaidya, the author of Hands-On GPU-Accelerated Computer Vision with OpenCV and CUDA. If you found this article enlightening, you may want to read Hands-On GPU-Accelerated Computer Vision with OpenCV and CUDA. This book is a go-to guide for you if you are a developer working with OpenCV and want to learn how to process more complex image data by exploiting GPU processing.